June is off to a great start here in Seattle, with sunny, high 70s weather this week. It hasn’t rained all week! What that also means though, is that it is time to start thinking about making sure my plants are getting enough water.
There are a few routes one can go when watering their plants; hand watering, soaker hoses, upside down bottles filled with water (good for containers), etc.. I considered all of these when I first started gardening and even tried a few. I now know that I suck at hand-watering, because I always forget to do it. With a large garden like I have now, it’s not really practical either, because it takes way too long. Plus, plants like to be watered at the roots, so as not to get the leaves wet. I was willing to spend a little extra time and money on the front end, if it would make it easier for me in the long run, so I decided to go with a drip irrigation system.
After doing some research online I realized that I didn’t want a system that had to be buried. It would have been more expensive and if anything froze or cracked it would be underground and harder to find and repair.
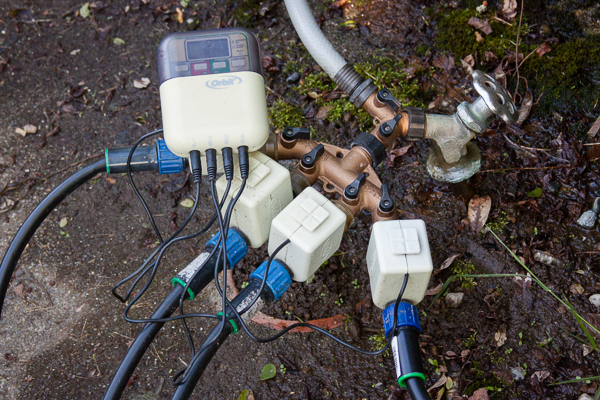
I found an affordable battery operated system (pictured above), made by Orbit, that would allow me to program 4 zones to be watered. It only needed to be hooked up to the faucet. Not pretty I know, but it did the trick and only just recently crapped out (just in time for the nice weather).
I liked the my original system and it worked well for me for 6 years. I always put the timer and valves in the shed for the winter, so they wouldn’t freeze, and I think that helped it last longer. When I went to replace it, a newer version of the Orbit Complete Yard Watering Kit is now available and it’s even better! Oh and before I get much further, this is not a sponsored post (I wish). This really is a product I use and love. I am an Amazon associate though, so if you do decide to buy any of this stuff, and use my links, I get a small percentage of the sale.
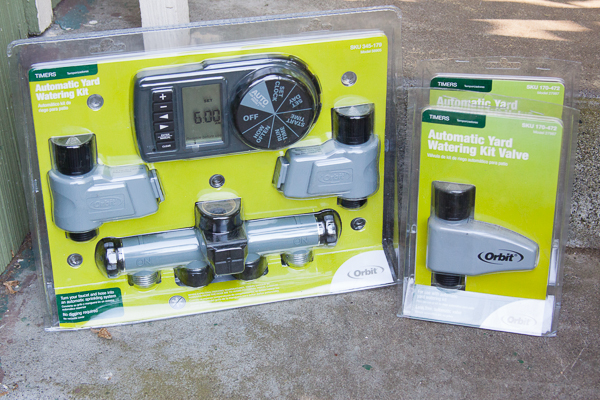 The redesign seems even sturdier and I already love it. The timer is even easier to set and the valves line up in a straight row which looks so much neater. The battery compartment is now on the side, instead of on top which will help keep water out, which is why I think my first one finally died.
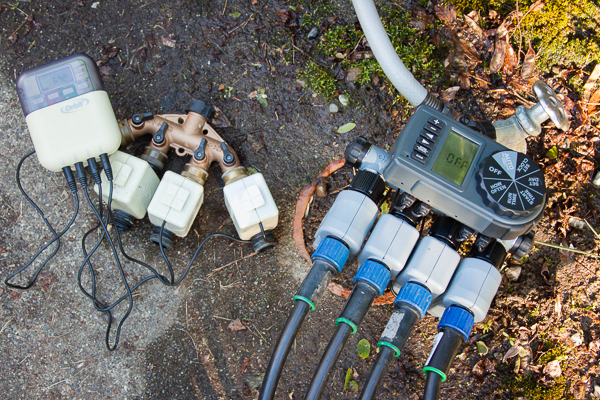
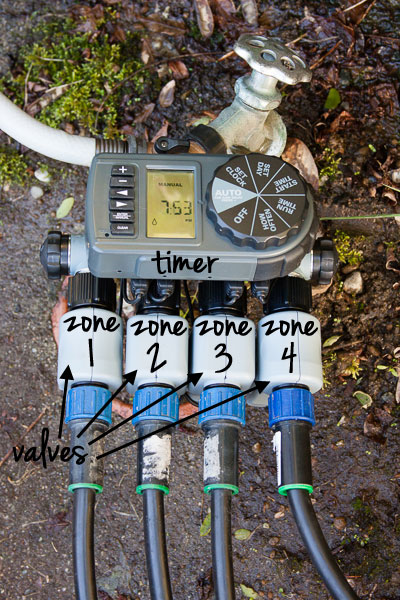
I have four raised beds in my garden and each one of them is a “zone”. The timer has four valves that each control a zone. I can set the timer to water at a certain time on certain days. For example, right now it is set to water every other day starting at 6am. It will then start with the first zone and water for whatever amount of time it is set for, before moving on to the next zone. I currently have each zone set to water for 60 minutes each. That may sound like a long time, but the water is only coming out at 4 gallons per hour through the drip emitter tubing, so it comes out slowly. The speed of the water is based on the flag dripper and I use 4 GPH flag drippers.
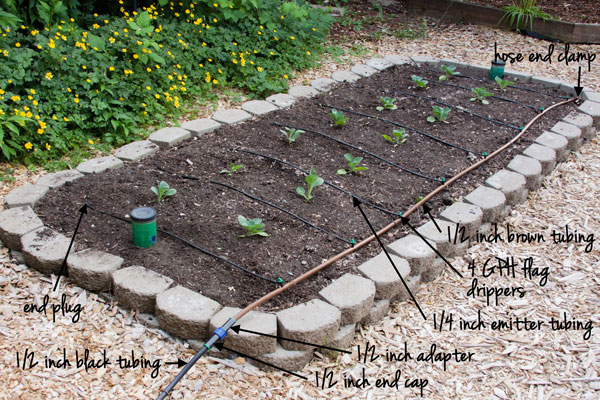
The brown tubing and the black tubing are the same, just different colors. I think the brown tubing came with a starter kit and the black tubing I got later. Technically you could just use one hose straight from the valve, but I find it is nice to have two sections; the 1/2″ black tubing that comes from the valve and the 1/2″ brown tubing (which I call the mainline) that the flag drippers and 1/4″ emitter tubing come off of. It is useful when it comes time to store the tubing over the Winter and for when a section needs to be replaced. I am constantly moving the 1/4″ emitter tubing depending on what I am planting (you can replug holes not in use and make new ones) so the mainline gets pretty beat up after a while. I have yet to replace any of the mainlines and I have been using them for years, but some of them are a bit leaky now.
Like I said at the beginning, this can be a bit of an investment, depending on how far you go with it. I have bought parts and expanded little by little, year by year, as my garden has expanded, so it never had to hit my pocket-book all at once. For me it’s been totally worth it.
If you are thinking of trying this, I would suggest going with a starter kit first. There are some very affordable ones out there, that come with everything you need. If you want to expand on that or want to jump in and start with your own parts, here is a list of the parts I use:
1. Orbit Complete Yard Watering Kit
2. Orbit Extra Valve for Complete Watering Kit
3. 1/2 inch hose end clamp
4. 4 GPH flag dripper
5. 1/4 inch emitter tubing
6. 1/2 inch adapter
7. 1/2″ end cap
8. 1/2 inch tubing
9. 1/4 inch end plug
10. hole punch tool
11. 1/2 inch loop stake
12. 1/4 inch loop stake
If anyone tries this for the first time, let me know how it goes for you. If you already have a drip irrigation system set up, tell me about it. I would also love to hear any other watering tips you have. I still have some areas that aren’t on the drip system (like my fig tree, my asparagus patch and my herb garden) and they tend to suffer, so I could use some help in those areas!

I was seriously just telling Chip that when we finally tame our yard and get a garden going I want to follow your drip irrigation methods. It really makes a lot of sense to do it that way instead of relying on yourself or running a wasteful sprinkler.
got drip gear for Sarah a couple months ago but we haven’t tried making it yet.
And the best…would be when helping to reduce polluted runoffs. Directing the rain water from down spots to rain barrels that could have those drip hose attached to the hosebit
I meant…*drip hosebib
Nice! That looks like a really sweet system. I am going to keep that in mind for my garden’s future.
Do you have a pressure regulator on this system?
No, but too much water pressure is not a problem at my house, so I haven’t needed it. There is a mesh filter in the 1/2 inch adapter and I can control how much water comes out per hour by what flag drippers I use, but that’s it.
Oh man…this is EXACTLY what I need! Awesome!
Hi, great post! I bought a (hopefully) nifty kit designed for drip watering container gardens. On clearance a year and a half ago, actually, and haven’t installed it yet. I needed some inspiration on the setup, and you have provided that, thank you.
I am wondering if the water gets too hot on hot summer days in the exposed black slow drip lines? The soil will cool it, I know, and it’s not spraying on the plant. But on a 95f day in the Pacific Northwest, black pipe/tubing can really heat the water up, like a solar oven or water heater. Is the cooling of a couple of inches of soil enough to protect the roots from hot water?
Personally, I think it would be great if the lines were some lurid color that I could easily avoid while weeding, but the convenience is great. Well, it will be great.
Hi Ducky, thanks for reading and commenting! Where do you live in the PNW where 95 degree weather is a regular thing? I’m jealous! Are you in Eastern WA or something? 95 degree days are rare here in Seattle, we get a few in July maybe, but I have never noticed an issue with the hoses (or the water for that matter) getting too hot. I have also set the timer to water in the morning, before it gets too warm, so if you are somewhere where it gets hotter during the day, just set your timer to water before it gets too hot. Hope that helps!
Great post, I have the same system and am now looking to upgrade to a wifi enabled system. As I did not originally instal the Orbit kit, I am unfamiliar with the parts needed for replacement. I imagine the Orbit kit would need to be replaced with a new valve system that is wired to a controller? Any idea what parts are needed to make the upgrade? For example, if you were going to incorporate something like a, “Rachio IRO Smart Wifi Enabled Irrigation” into your system, where would you start, what parts in your system would need to be replaced?
Hi Joe, thanks for writing. Unfortunately, I don’t know anything about the Rachio system. It looks cool though! Good luck and let me know how it goes!
My wife and I was impressed with your water drip system this last Saturday and we decided to purchase the Orbit yard watering kit , this will help with watering were we need it.If this works out , im going to purchase a second kit.Where do you suggest getting additional tubbing and drippers.
Thanks
Dick &Dolly Vilog
Oh cool! I’m glad it worked out for you. I get all my extra tubing and parts at Mclendon’s, but I think Home Depot carries most of that stuff too. Let me know how it goes!
Great post, you got me hooked to orbit timer
I have been working with timers for many years (over 20) and I have both models you mentioned. I use one at home and one at vacation home. What I would like to add is a rain saver. So if it’s raining the system will not turn on. Had this on an inground system and would love to add to any timers.
A rain saver sounds like something I could totally use here in the rainy Pacific Northwest. I hate it when it rains and I end up overwatering. All my system has is a 24 hour rain delay you can select if you catch it before it starts watering. Or I just turn it off during really rainy spells. If you have a brand or source for them that you like, I would love to know!
Very Kool post. We’ve used Orbit timers before. Great product. Question.
Think this this system would work with 4x soaker hoses? Big dahlia garden to feed..
Thanks
I think so! You just might want to do a non-soaker hose from the timer to whatever area you want to water so you aren’t watering areas you don’t need to, like pathways.
Great to see your drip system. We’ve had our raised beds on a Dripworks system for about 12? 15? years. I’m also in Seattle. Our water pressure is too high to run our system without pressure reducing valves. We a 3 zone system – 2 zones for six 3-1/2’x15′ raised beds – 3 for dahlias and 3 for veggies. Also another zone for a rambling bed of roses, clematis, and more dahlias. The last few years we’ve had a lot of damage to the 1/4″ tubing from raccoons.
Do you have any backflow prevention on your system? It’s a city requirement for irrigation systems, something I’ve ignored until this year.
This is great! What I’ve been trying to figure out is how to attach my large rain collection barrels to a pump and timer and then onto my drip irrigation system. I’ve got the beginning and end… it’s the middle that’s confusing! THIS is the stuff they should teach in school