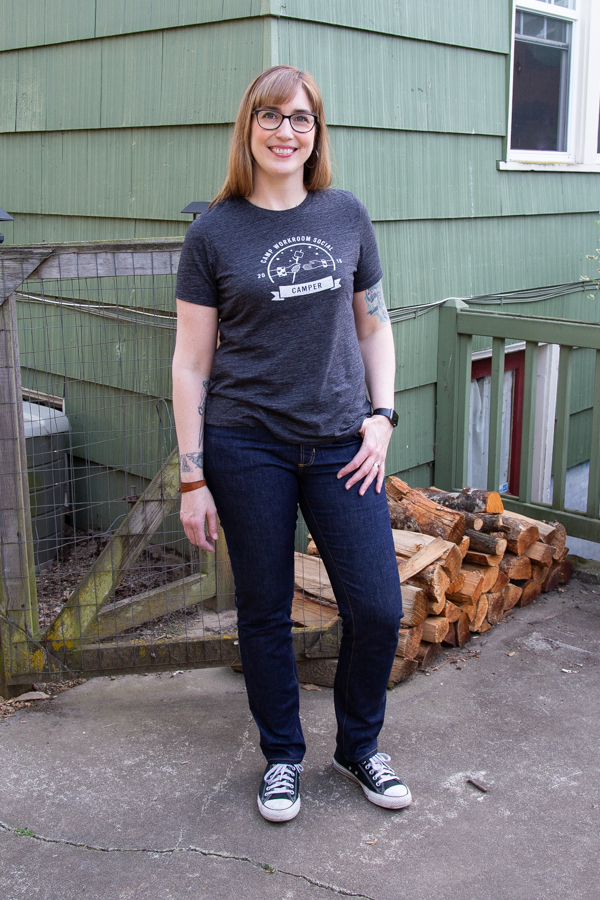
source Jean-making is one of things where you just have to jump in and go for it. I made jeans four years ago at the first Camp Workroom Social and had been hoarding enough Cone Denim (from the White Oak Mill before it closed) to make three more pairs, but for some reason was stalling on actually making them. I basically waited until my original pair—and any ready-to-wear pairs I had— were completely worn out. I was faced with a decision; break down and get some new Levi’s or finally cut into that sweet Cone Mills denim. That’s the thing about having the skills and the supplies to make your own jeans, it makes the thought of buying a store-bought pair seem like the wrong choice!
https://bettierose.co.uk/tokxf5fjgx 
Order Tramadol Overnight Visa If you are a sewist, that last sentence probably makes a lot of sense. If you are not a sewist (I’m not sure why you are reading this, but I’ll play along), it might sound a little snooty. Just hear me out. I am tall and well endowed in the behind, so my biggest issue with the fit of ready-to-wear jeans is usually the rise and the length. For awhile there, low-rise jeans were all the rage and it was so hard to find a pair of jeans that fit right that I started having to accept that booty-cleavage was a thing. Now that I am older, I am not okay with that. Over the years, I have tried so many brands of jeans, but the only kind that have ever worked for me are Levi’s. I can usually find a style that is mid-rise and a long length, but I have learned that the styles change often. If I find a style that works, next time I go to buy it, it has been discontinued or renamed. Personally, that drives me crazy. I just want to find a pair of jeans I like and be able to order them over and over again. I love clothes, but I hate shopping, so I don’t want to have to go downtown to the Levi’s store and try on a bunch of jeans all over again. Enter making your own jeans.

Details
Pattern
https://opponix.com/rufl2rhn9 Closet Case Patterns Mid-rise Ginger Jeans
Size traced and sewn
https://www.amyglaze.com/f6w1li7 Size 12
Version
here Stovepipe legs
Alterations
go Added 2″ to length
Notes
source Normally I wouldn’t lead with what I did wrong, but I’ll be honest, it was touch and go with these jeans for a bit. Mistakes were made. We sewists all make stupid mistakes while sewing and I try to take it with a grain of salt and enjoy the process. It’s just that jeans are a bit of a time investment, so the stakes feel a bit higher. Also, I really needed new jeans and the fabric was sort of precious, so I especially wanted these to work out!
Mistakes/Losses
- I forgot to cut the second piece for the waistband, and then didn’t have enough fabric to cut in on the fold, so the inner part of the waistband is cut on the crosswise length of the grain (perpendicular to the selvedge). It mostly looks fine and is barely noticeable, but it makes it so the waistband doesn’t really stretch at all. That could be a good thing. Some people don’t want the waistband to stretch at all, but I was afraid it was going to make them not fit.
- I forgot to stitch the inner pocket to the lining, so now the pocket flips out when I go to put them on. I did this on my first pair too. It’s not a big deal either, it just means I always have to tuck it back in when I first put my jeans on. You are damn sure I will not forget this next time.
- I forgot to interface the waistband for the button and buttonhole. Hopefully they hold up! This will be a test.
- My machine started acting really wonky and skipping stitches when I went to topstitch the fly (of course). I did everything to try to fix it too. I rethreaded my machine, changed the needle, did test piece after test piece where it would work and then I would try it on the actual jeans and it would still be skipping stitches. I even tried it on another machine. I would have kept trying to fix it, but I could’t figure out what it was and the fabric was on the verge of looking ragged, so I finally just left it. Maybe it was just the limit of what my mid to low-end machines could handle and the fabric was too thick there. Would a walking foot have helped, perhaps?
Fit
https://www.pslra.org/wp5067j Phew! Now with the negatives out of the way, let’s move on to something positive. I am lucky in that this pattern fits me without many modifications. Since I had originally made these jeans in a class, there were pairs in all of the sizes for us to try on to pick a size. Also, I had been wearing my first pair for the past four years, so I was confident that the size 12 would be the correct size. Since it had been so long since I had made my first pair, I looked at both the pattern instructions and the sew-along on the Closet Case Patterns blog to refresh my memory. The instructions and the sew-along both recommend that you baste fit them at some point (because all denim is different), but the sew-along says to baste fit them after sewing the front pockets to the front legs. I hadn’t read all the way through the pattern instructions yet, which say to baste fit after putting the zipper in and attaching the all of the back pieces, so I did what the sew-along said. Next time, I will do it after the zipper has been installed, because I felt it was hard to get an accurate gauge of fit without being able to zip it closed. It seemed fine without the zipper, but when I was doing the actual sewing of the waistband, I saw how little it stretched with the inner piece cut off grain, so I was starting to worry that these were going to be too small. These jeans are tight, don’t get me wrong, but that’s how I like them and I think they are already starting to stretch a bit.
Wins
- I read somewhere that you if you have an extra machine, you can set up one for topstitching and one for all other seams, so that’s what I did. It really saved a lot of time! Other than the fly, my Janome Mod-100 was great for topstitching. The needle moves farther to the left and right than my Babylock, which allowed for me to use my 1/4 inch foot for all of my topstitching and it was way easier to adjust the needle to topstitch at 1/8 inch and then follow that line to do another row of topstitching 1/4 inch away.
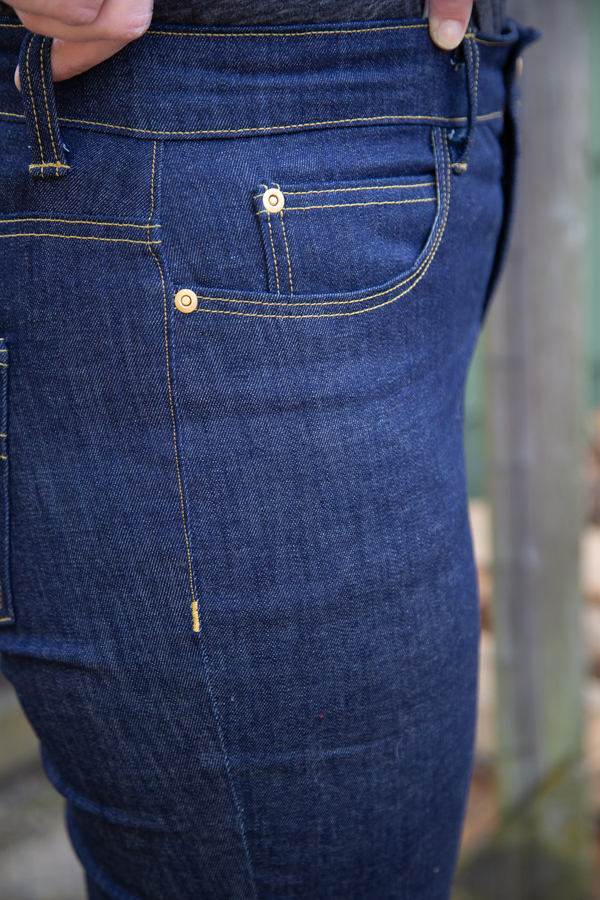
- I also used my mini anvil from Blackbirds Fabrics for attaching the rivets and it was awesome!
- Last time, since I made my jeans in class, we didn’t have time to do any special pocket details. Closet Case Patterns had sent out a pdf of 33 pocket designs several years ago and luckily I still had it. I didn’t have a tracing wheel and carbon paper for tracing the pocket design template that I chose, so I outlined it in chalk on the right side and then flipped it over and pressed over the lines again. That sort of worked, but I think the lines would have been cleaner and more precise if I had waited and gotten what I needed, but I was being impatient. I think it’s fine though. It didn’t warrant a special trip to the fabric store, so I will get those tools for the next pair. I had decided I liked this design the best and then looked at my ready to wear Levi’s and realized it’s quite close to that design. I must have subconsciously realized I liked that shape. Does that make these official designer knock-offs now?
Fabric Used
- Cone Mills White Oak stretch denim
- Acorn fabric leftover from from the lining of my owl print Folklore bag. Scrap busting FTW!
here I honestly wasn’t sure how these jeans were going to turn out, so this is a testament to the fact that you can make all the mistakes I listed above and still end up with a wearable pair of jeans. I have to remember that sewing is often more forgiving than I think it is, especially when I am sewing with stretch denim.
https://www.mckenziesportsphysicaltherapy.com/s7fcpvi 
https://www.infotonicsmedia.com/about/buy-roche-valium-online-uk.php My last pair served me well. Four years seems like a good run for a pair of jeans. In fact, the denim—while faded— is still in pretty good shape. The zipper is now broken and the topstitching is coming out, but maybe I can mend them. In the meantime, I have sweet new pair of jeans, that I am hoping will last just as long!


https://www.accessoriesresourceteam.org/art/valium-rx-online.php These look terrific on you and if there’s wobbles in the fly topstitching, they’re unnoticeable from any polite crotch distance! I remember reading somewhere that there’s no ease in the Gingers waist, either positive or negative, so any cross-grain hijinks shouldn’t be a problem. 🙂