source link It’s another two-fer! Continuing on with my “cake” kick, I recently sewed not just one, but two Hey June Handmade Halifax Hoodies! As my ready-to-wear basics have been wearing out, I have been slowly replacing them with me-mades. If you know me at all, then you probably also know that hoodies are a big staple of my wardrobe. What can I say, I like routine and not having to think a lot about what to wear sometimes! One could say it’s part of my uniform and has been basically since I was child. When I was around three I think, I remember having a favorite green hoodie that had an embroidered frog on it (I loved frogs when I was a kid). I wore that hoodie all the time. I remember sticking play dough in the pocket and it drying there. That may have been the end of that hoodie.
Details
Pattern
enter Hey June Handmade Halifax Hoodie
Fabric
https://www.iql-nog.com/2025/01/19/iq3n36b56 French terry in navy and black from Dry Goods Design.
Size traced and sewn
https://www.mssbizsolutions.com/dn3di0w9s1r Medium
Buy Valium India View C

Alterations
https://www.accessoriesresourceteam.org/art/buy-cheap-valium-online.php For the first one (the navy blue one), the only thing I changed was that I lowered the buttonholes for the drawstring about an inch. On the second one (the black one), I lowered the buttonholes even more, so they were about 2.5 inches down from the original mark.
https://osteopatiaamparoandres.com/0mq28vs 
Construction Notes
-
I did not do the zipper facing/binding and left the zipper uncovered on both versions. I did put white thread in my bobbin, so the thread would match.
-
Lowered the buttonhole placement about an inch on the hood of the navy version, which was better than the original placement, but could have been lower. On the black hoodie, I lowered it even more, so the placement was 2” up from the bottom and 1.5” over.
-
Used interfacing on all buttonholes, which was necessary because the buttonholer would not sew correctly without it.
-
I missed the note in the instructions about using a thinner knit for the neck binding if using a thicker knit (which I was). As a result, the neck binding on the navy one is very bulky, kind of sloppily sewn, and is coming undone already.
-
Eliminated the neck binding completely for the black version and just serged the hood to the body. I think it looks great everywhere but at the top of the zipper, so I am going to continue to work on the best way to finish the neckline of the hood on future versions. It will probably just involve being more careful about how I line up the hood or even finishing the top of the zipper differently.
https://bettierose.co.uk/gra0qwlb2 
Fit
Buy Cheap Tramadol Online I like my hoodies to be more on the fitted side, so the navy blue one fits just like I like it. The black one on the other hand is a bit tighter; mostly in the arms. I thought this was the same exact fabric—it was labeled the same at Dry Goods—but the black fabric seems to have less stretch than the navy blue one, so is slightly tighter as a result. Full confession, I can’t even pull my sleeves up on the black one, so I may want to widen the sleeves next time.
Final Thoughts
see While I like to dress up occasionally, the reality is that my life is very active and casual for the most part. I live in hoodies, jeans, and tee shirts, so making my own of these things makes a lot of sense for me. Plus, a nice hoodie can be expensive. The idea that I never have to buy a store bought hoodie again is very exciting to me. Now that I have made some basic solid colors, I will be keeping my eye out for fun sweatshirt knit prints!
https://valkyrieswebzine.com/nouvel/buy-generic-diazepam-10mg.php
https://www.frolic-through-life.com/2025/01/nij3witfq9


https://www.amyglaze.com/b2sh4bja It’s 2022, and if you are still blogging and can remember making the Halifax hooded sweatshirt, I could sure use your insights on the zipper. I feel like i followed the very well-written directions, but after shortening my zipper form the top and then removing a 1/2 of the teeth, there is no longer a zipper stop. I thought perhaps that the neck binding was designed to function as a stop, but nope. I have ordered some stops, but in the mean time, i zip it up, the zipper comes off, and I put it in my pocket. Just pulling the top of the zipper slits it apart, so I can simply slip on the zipper piece, and close it again.
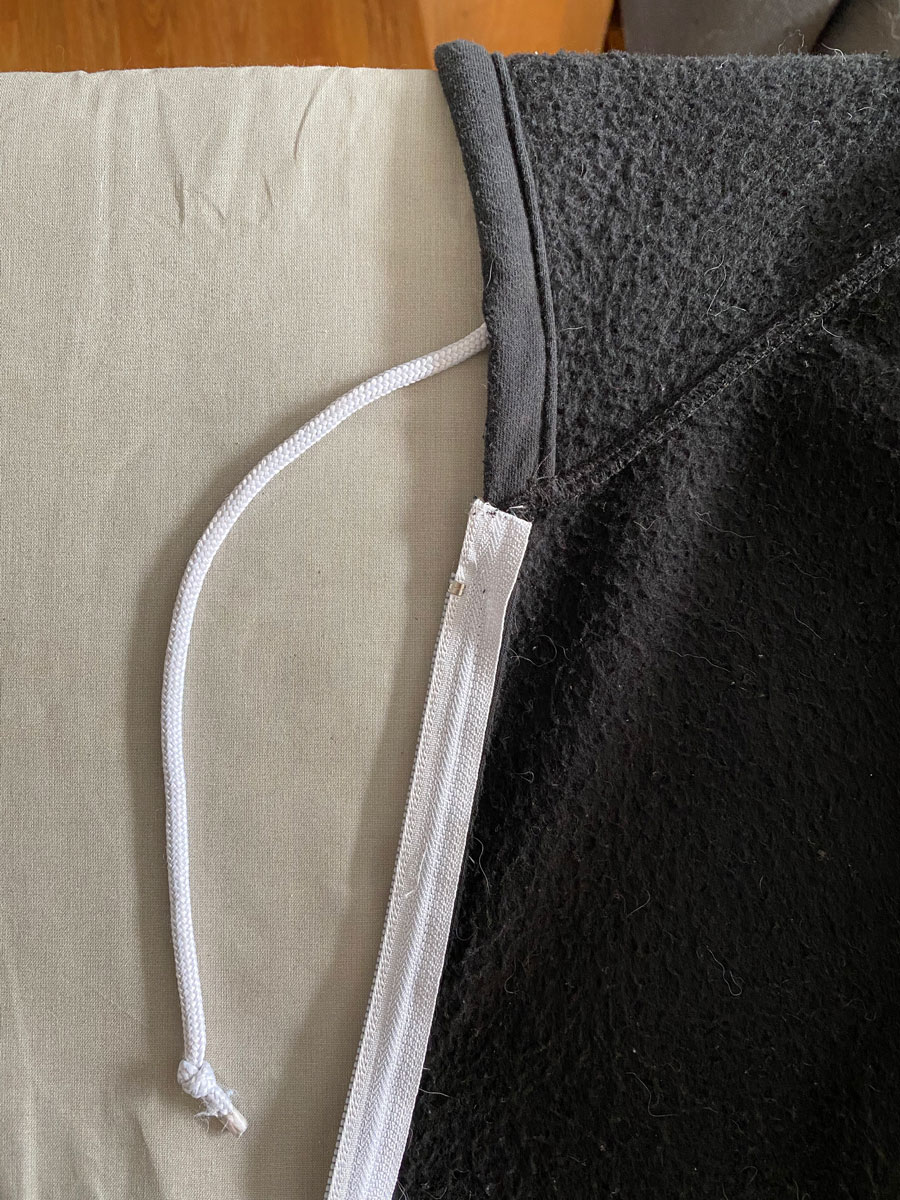
https://hereisnewyorkv911.org/74ba5rh82fd Hi there! This blog is still active! Sorry to hear you are having trouble with the zipper. I have made three of these now and I don’t think I have totally followed the pattern’s instructions for the zipper since the first one. After making the first navy blue hoodie, I opted to leave the neck binding off since it added so much bulk. I’m not sure what size you sewed, but since I sewed a size medium and it called for a 25″ zipper, I used a 24″ separating zipper instead. It totally still worked as the zipper tape makes it 25″ inches, and then you don’t have to shorten it. Since the neck edge is just serged, I just folded the top of the zipper tape under a bit to finish it. Here is a picture if that helps: It’s not the prettiest finish, but I looked at a ready-to-wear hoodie I had and it pretty much looks the same, so I am fine with it. Hope that helps!